Clafoutis de cereixas

O clafoutis é unha sobremesa que campa que rabea e que é moi sinxela de facer. Hai varias versións dependendo da froita que se empregue para facelo, mais a de cereixas é a máis típica, e xa que agora están de tempada, é a mellor opción. Iso si, a única parte complexa da receita é sacarlle as carabuñas ás cereixas, mais asegúrovos que paga ben a pena.
Pode semellar que o clafoutis é un simple biscoito, mais o seu sabor non ten nada que ver. A masa é moito máis líquida, o que dá como resultado unha textura e un sabor que poderiamos dicir que é unha mestura entre o flan e as tortiñas. A cantidade de azucre e fariña é menor que na maioría dos biscoitos, mais o seu sabor é doce e moi suave.

A cantidade de cereixas dependerá do molde empregado. Este meu é de 25 cm de diámetro, polo que me fixeron falla uns 700 gramos de cereixas (pesadas co rabecho). O importante é que as cereixas cubran ben a base do molde e queden os menos ocos posibles. E se non sodes moi de cereixas, ou vos gustaría probardes con outra froita, aquí tendes a versión con mazás das receitas de Xiana e a versión con amoras de Bolboretas no bandullo. Non vos queixedes, que ata semella que nos puxemos de acordo para que non teñades desculpa e preparedes esta saborosa lambetada.
Ingredientes:
- 700 gramos de cereixas
- 150 gramos de fariña
- 125 gramos de azucre + 1 culleradas para as cereixas
- Un belisco de sal
- 4 ovos
- 400 ml de leite
- 1 culleradiña de esencia de vainilla
- Azucre en po para decorar
- Manteiga para o molde
Molde de 25 cm
Preparación paso a paso:
1. Preparamos o molde botándolle manteiga por toda a base e os laterais.
2. Sacámoslle a carabuña ás cereixas. Eu fíxeno cunha botella e unha palliña e a verdade é que é un bo sistema, rápido, eficaz e sen esforzo. Só temos que poñer a cereixa na boca da botella, cravar a palliña no medio e facer forza ata que a carabuña saia disparada polo outro lado.

3. Poñemos as cereixas sobre a manteiga no molde e botamos unha cullerada de azucre por riba.

4. Mesturamos o resto dos ingredientes: azucre, fariña, ovos, leite e vainilla.

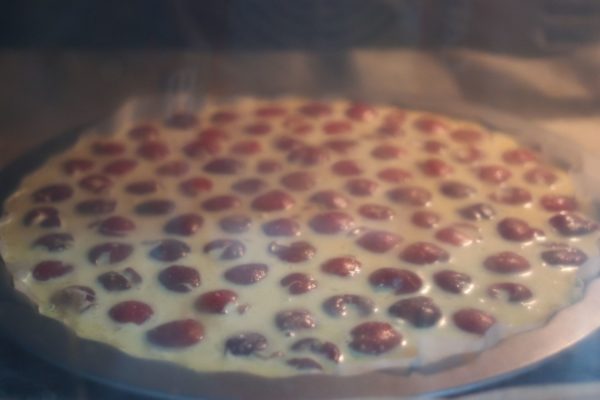
5. E vertemos esta masa sobre as cereixas, que comezarán a subir, mais tranquilas, que non se moven 🙂

6. Enfornamos a 200ºC durante uns 30 minutos ou cando o escarvadentes cravado no centro saia limpo. E listo!
Agora só temos que decorar co azucre en po e papalo. Non vos ten máis ciencia. Ao sacala do forno, veredes que a masa medrou, mais en canto vaia arrefriando, irá baixando. É unha sobremesa que se pode tomar tanto quente coma fría, polo que se sodes moi impacientes e non queredes agardar, xa lle podedes meter o dente aínda quente. Iso si, o certo é que uns días despois, aínda está máis saborosa, non a papedes toda o primeiro día!
_______________________________________________________________
Cherry Clafoutis
Clafoutis is a sweet treats ad beautiful and delicious as easy and quick. There may be different versions depending on the fruit you want to use, but let’s be honest, the tastiest and most typical is that made with cherries. The only hard step of this recipe is taking the stones out of the cherries, but it is so totally worthy!
It may seem clafoutis is just a simple sponge cake with fruit, but its flavour has nothing to do with usual cakes, in fact, its batter is much runny and both texture and flavour can be defined as something between a creme caramel and a pancake. The amount of flour and sugar is much less than in every other cake, and thanks to cherries, it is super sweet and smooth.
The amount of cherries depends on the baking mould you’ll be using. Mine was 25 cm diameter and I used 700 gr cherries. The important thing is that cherries occupy the whole mould base with not many holes. And if you’re not a cherries fan, you can try with other fruits and make your own favourite clafoutis version.
Ingredients:
- 700 gr cherries
- 150 gr flour
- 125 gr sugar + 1 tbsp
- A pinch of salt
- 4 eggs
- 400 ml milk
- 1 tsp vanilla essence
- Powdered sugar
- Butter for the mould
Baking mould 25 cm
Step by step preparation:
1. Butter mould base and sides.
2. Take out cherries stones. I did it with a bottle and a drinking straw, as you can see in the pic. You just have to place the cherry on top of a bottle, push hard the cherry with the straw and so the stone will be easily removed through the other side.
3. Place cherries over the mould and add in the tbsp sugar.
4. Mix the test of the ingredients: sugar, flour, eggs, milk and vanilla.
5. Pour this batter over the cherries. They will start coming up, but don’t worry, they won’t move and will stay in place. 🙂
6. Bake at 200ºC for around 30 minutes or until a toothpick inserted in the middle of the clafoutis comes out clean. And that’s it!
Now we just have to top the clafoutis with some powdered sugar and eat it! No more steps needed to try this piece of heaven! When taken out of the oven, you’ll see the clafoutis has risen in the oven, but as soon as it gets cold, it’ll start to go down. It’s a treat you can either have hot or cold, so if you are like me and cannot wait for cakes to cool down to taste them, you can have it hot (with some ice cream is delicious!) But, what I have to recommend you is for you to keep some for a couple of days later, and you’ll see clafoutis gets better as days go by.