Galletas remuiñadas

Hai galletas que saben moi ben, aínda que non teñan unha gran pinta, tamén as hai que teñen unha pinta estupenda, mais non as acompaña moito o sabor, e despois están estas galletas remuiñadas, que son ben feitas e moi saborosas! E, ademais, de dous sabores, de chocolate e de vainilla! E todo, na mesma galleta!!! Os ingredientes, moi sinxelos, e o paso a paso, aínda máis con estes truquiños que vos dou. Han quedar perfectas, xa veredes! Imos aló!
Ingredientes para 24 galletas:
– 200 gramos de manteiga
– 250 gramos de fariña
– 100 gramos de azucre en po
– 25 gramos de cacao
– 40 gramos de fariña
– un chisco de vainilla
– auga
Preparación paso a paso:
1. Mesturamos a manteiga ben fría, a fariña e o azucre en po ata ter un boliño de masa. (Kukiconsello: podedes mesturar a fariña e a manteiga nunha picadora e despois engadir o azucre en po e mesturar coas mans).

2. Pesamos a masa (esta tiña uns 500 gramos) e dividímola en dous boliños de peso similar. A un deles engadímoslle os 40 gramos de fariña e un chisco de vainilla (mellor se é directamente da vaina). E amasamos de novo.

3. Ao outro boliño engadímoslle os 25 gramos de cacao e amasamos ben ata que teña unha cor uniforme e todo o cacao estea ben integrado. Envolvemos as dúas masas en papel film e refrixerámolas durante unha hora.

4. Nun papel de forno, debuxamos un rectángulo de 26×22 cm, dámoslle a volta (para que a masa non toque a tinta) e co rolo de amasar imos estirando a masa ata que teña esta forma rectangular. Terá que quedar a masa duns 4 mm de ancho. (Kukiconsello: non vos preocupedes se ao principio a masa rompe, iso é porque está fría, cando a vaiades amasando e colocando cosas mans – sen medo! – veredes como se irá poñen a xeito).

5. Poñemos un anaco de papel film sobre a mesa, dámoslle a volta ao papel de forno coa masa e levantamos pouco a pouco. Sae moi ben do papel, así que non vos costará nada. Cun chisco de auga e un pincel de cociña, mollamos a masa para que a outra pegue ben.

6. Repetimos a operación coa masa de cacao, poñéndoa sobre a outra que xa temos preparada.
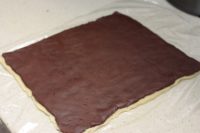
7. Mollamos tamén esta masa para que pegue ao enrolala.

8. Enrolamos ata o final, axudándonos do plástico que a cubre e pechamos ben para deixar o roliño refrixerar na neveira durante media hora.

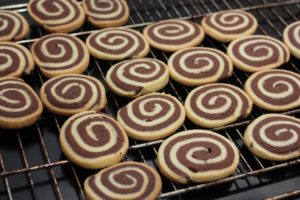
9. Cun coitelo con folla ben ancha cortamos rodelas duns 7 mm.

10. Poñémolas sobre a bandexa do forno cuberta cun papel (podemos empregar o que usamos antes para amasar) e enfornamos a 160ºC co ventilador durante uns 15-20 minutos ou ata que vexamos que os bordes comezan a poñerse douradiños. Caberán unhas 12 de cada vez. En dúas fornadas, xa estarán todas feitas.

11. En canto as saquemos do forno, aínda estarán algo brandiñas, deixaremos que arrefríen sobre a grella do forno ata que estean duras. Unha vez estean frías, gardarémolas nunha lata para que non se poñan brandas coa humidade e a calor. E listo!
Non vos asustedes ao ver tantos pasos, non é unha receita complicada, mais cómpre explicala ben 😀 Non son unhas galletas excesivamente doces, algo que me gusta, mais si perfectas para mollar no leite, no café ou no que queirades. E teñen ese aroma e sabor a manteiga que tamén as fai ideais para tomar cun té. Ademais, podedes deixar o rolo por uns días na neveira e ter galletas sempre acabadas de facer. Ou incluso conxelar a masa e facelas cando queirades! Son todo vantaxes 🙂
______________________________________________________
Pinwheel cookies
There are cookies which taste really good, though they don’t look good, there are others which look yummy, thou they’re not, and then we’ve got these super delicious and cute pinwheel cookies! They have it all! And, if that’s not enough, you get two flavours in just one cookie! Ingredients are super easy to find, and with some simple tricks and a detailed step by step, you’ll get the best pinwheel cookies ever! Let’s go!
Ingredients for 24 cookies:
– 200 gr butter
– 250 gr flour
– 100 gr powdered sugar
– 25 gr cocoa
– 40 gr flour
– some vanilla essence
– water
Step by step preparation:
1. Process cold butter and flour in a food processor. Then add powdered sugar and mix well until you get a firm and integrated dough.
2. Weigh the dough (mine was 500 gr), divide into two of a similar weight and then add 40 gr of flour and vanilla to one of them and knead again until fully mixed.
3. Add cocoa to the other dough and knead until the texture is uniform and cocoa is fully integrated. Then, wrap both dough balls with some plastic wrap and refrigerate for around an hour.
4. Over a baking sheet, draw a rectangle of 26×22 cm (turn it over, so ink does not touch the dough) and roll the dough with the rolling pin until you get a perfect rectangle with the vanilla dough and with the cocoa dough. (Kukitip: don’t worry if the dough breaks at first, that’s because it’s cold, it will change while you roll). Dough should be 4 mm wide.
5. Put the vanilla rectangle over a plastic wrap. You just need to put it over the plastic wrap and then take the baking sheet out carefully. Easy peasy! With some water, brush the dough so both rectangles stick to each other.
6. And repeat the same procedure with the cocoa one.
7. Wet the cocoa dough and start rolling.
8. When rolling, help yourself with the plastic wrap and then refrigerate the roll for half an hour.
9. With a knife of wide blade, cut cookies of about 7 mm wide.
10. And then place them over a baking tray with a baking sheet on (we can use the one we have previously used to draw the rectangle) and bake with the fan on at 160ºC/320ºF for around 15-20 minutes or until the edges start to get a brown colour. You can bake 12 at a time.
11. Don’t panic if they’re soft when coming out of the oven, allow them to cool down over a wire rack and then keep them inside a metal box, so they won’t end up too soft due to humidity and heat. And that’s it!
It looks like it’s a difficult recipe if you count so many steps, but it’s not! They’re not super sweet cookies, but they’re the perfect sweet treat to have with some coffee, milk, chocolate or tea! They have that butter-y flavour and smell I absolutely love! Besides, you can keep the dough for a few days in the fridge, or for longer in the freezer and use it whenever you want to have freshly-made cookies at home! Enjoy!!!