Que veña o frío e a gana de facer filloas, é todo un! Aproveitas para estar ao quentiño na cociña e, de paso, comer unhas poucas filloas, que están boísimas e quentan ben o corpo! Como vedes, todo vantaxes.

É complexo indicar as cantidades con exactitude. Máis ou menos, serán uns 200 gramos de fariña por cada litro de auga. Pero o mellor é ir vendo como nos vai quedando e probando.
Hai quen lle engade leite ou ovos. A mín gústanme así, enxebres! 😉 Ben, de feito as miñas favoritas son as que se fan coa auga de cocer a carne do caldo, pero como non fixen caldo, van así!
Ingredientes
Un anaco de touciño
Graxa de porco
Auga, se é de facer o caldo ou o cocido, mellor
Fariña do país
Sal

Preparación
- Poñeremos un anaco de touciño nun garfo, que nos axudará a untar a tixola de graxa. E botamos unha cullerada de graxa nun prato.

- Coa auga e a fariña, facemos o almoado. (Na miña casa sempre lle chamamos así, aínda que a forma estándar é amoado). Mesturamos todo ben ata que teñamos unha masa que non sexa nin moi espesa nin moi rara (líquida). Xa vos digo que será cuestión de ir probando. Cousa que faremos tamén co sal.

- Quentamos a tixola e untámola coa graxa no touciño.
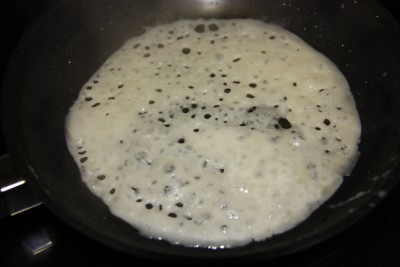
- Botamos o amoado pouco a pouco ata que cubra toda a base da tixola. É importante controlar a temperatura, máis ou menos será un chisco máis do que normalmente sería lume lento. Se a masa se pega moi axiña, é que a tixola está moi quente. E se a masa se move moito pola tixola, pero non se pega, é que está moi fría. Se tedes a posibilidade, podedes extender o amoado coa axuda dunha trolla.


- Cando se levanten lixeiramente as beiras da filloa, é momento de darlle a volta.

- Deixamos que se acabe de facer polo outro lado e xa estaría preparada.

Agora só temos que ir facendo filloas e poñéndoas todas nun ‘murico’ para chegar a ter unha boa filloada! Se tedes a alguén pola casa que é coma min, é dicir, que lle guste comer as filloas acabadiñas de facer, procurade tela entretida, porque se anda pola cociña, a filloada verase reducida drásticamente!!! 😉
Se tedes algunha dúbida ou comentario, non dubidedes en comentar! Ah! E se alguén de vós a fai e lle saca unha foto, podédesma enviar a kukinhasblogue@gmail.com e colgareina no blogue!
________________________________________________________
Galician Filloas

Cold and filloa-making is something my mind immediately connects! It’s an incredibly nice way of getting warm! Don’t you know what a filloa is? Well, someone would say it’s a crepe, but I don’t agree. Let me explain myself. A crepe is something sweet made with butter, right? Then, a filloa is something salty made with lard. Delicious! 🙂 Let’s see how we can do Galician filloas!
Ingredients:
– the white part of bacon
– some lard (pigfat)
– water
– flour
– salt
It’s difficult to specific the exact quantities of each ingredient. For a litre of water, more or less 200 gr flour. But the best way is to try and try!
There are maaany ways of preparing filloas, I like this one! It’s simple but surprisingly tasty! In fact, my favourite are those made with the water used when boiling the meat to prepare the Galician broth. For me, the best filloas EVER!
Step by step preparation:
1. Stick with a fork a little bit of bacon, to spread the lard over the frying pan. And put some pigfat on a plate.

2. Mix the water and the flour and make the ‘amoado’ (specific filloa batter name). And add a pinch of salt.

3. Heat the pan, and spread some lard over it with the bacon.
4. Add the batter bit by bit until it covers the whole pan surface. It’s important to control the temperature, if you see the batter runs quickly along the pan, it’s too cold, but if you see it’s too sticky, it’s too high. As I said, it’s something difficult to explain, but you will get ir right away, as you do it, I’m sure! 😉 If you ever happen to come to Galicia, ask for a ‘trolla’; it is used to spread the batter all over the pan.
TROLLA


By the way, don’t panic if you see the first filloas do not come out well, this is usually the case, so don’t worry!
5. When the filloa edges begin to raise, it’s time to flip it.
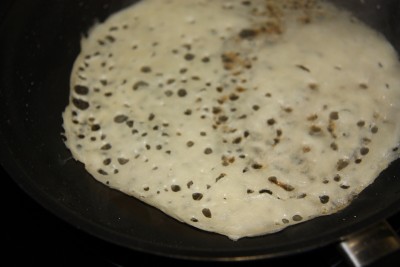
6. And it’s almost done! The other sode will be ready in a few seconds. And that’s it!

Now, you just have to prepare filloas until you have lots of them in a plate, what we call a ‘filloada’. The best to eat them is as you make them, all alone, with no more ingredients than the filloa itself. (Kukitip: they are awesome with honey!)
If you have any doubt or comment, please let me know! And if you prepare any of these recipes, and you take a picture, send it to me to kukinhasblogue@gmail.com and I will pin it on the blog!
Oh la la, una copia,mejorada, de las crepes francesas!!!
A ver si los franceses aprenden 😀
Hihihi! As filloas son o mellor! Filloa rules! 😉
na miña casa sempre lle chaamamos almoado pero así está ben un biquiño kukinhas
Tes razón! Cambiei as palabras para adaptalas á forma estándar, e cambiei de máis! Agora o cambio! 😉 Un biquiño!!!